Posts under this project (1)
Project: Proxmox Homelab
Way back in 2014 I started experimenting with bare-metal Virtualisation. At that time I had mainly been experimenting with the Xen Hypervisor with the aim to get Windows,...
by Thomas Preece Read more...One of the key bits of tooling that I run on my Proxmox homelab is a set of VMs that allow me to intercept network requests for analysis and tampering. This allows me to put any VM into a test environment where all network traffic is monitored and logged for analysis. It also allows me to tamper with the responses and in the extreme case, fake all responses so the VM has no internet connectivity but it thinks it does.
This tooling is extremely useful for testing malware and other unknown programs where you want to understand what information it may be leaking and what servers it is contacting. As any VM can be put under test, this allows for testing applications running on many different operating systems such as Windows, Linux and Android and even different architectures. With an added networking card you can also extend your testing out to devices in the physical world.
This project consists of the following:
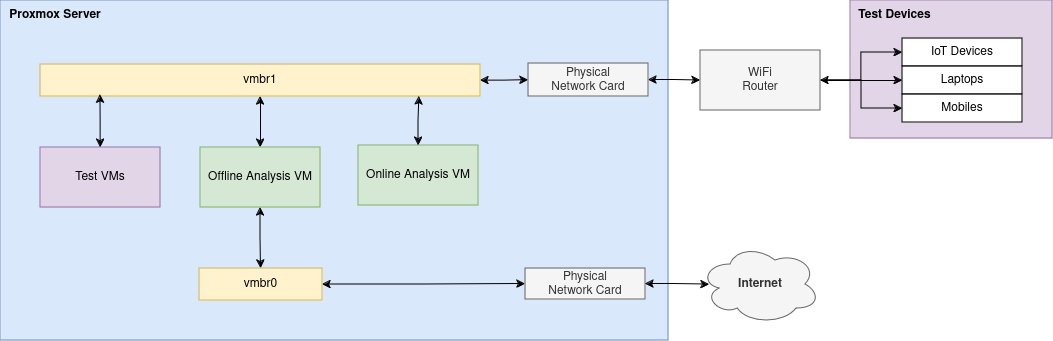
- Network VMs:
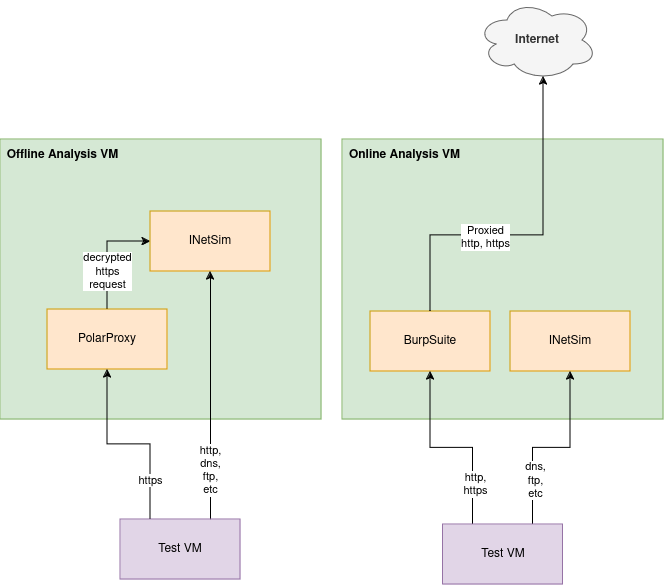
- Offline Analysis VM – Test application has all traffic routed through this VM. INetSim is then setup to respond to common services such as DNS, HTTP, etc and log the requests made. PolarProxy is also leveraged to provide the ability to respond to HTTPS (provided the PolarProxy CA is injected into the test VMs/applications). The INetSim VM and Test VMs has no access to the Internet so all server responses are faked or dropped (depending on requested port/service) by INetSim.
- Online Analysis VM – This is an alternative to the above VM. Again INetSim is setup to respond to common services such as DNS, FTP, etc and log the requests made. However, this time BurpSuite handles HTTP(S) requests and proxies then to the internet. This allows analysis on applications that need specific responses back from the internet. The Online Analysis VM has internet access but the Test VMs do not. Only HTTP(S) traffic from Test VM is allowed out to the internet via BurpSuite.
- Test VMs:
- Ubuntu VM – For testing Linux applications. Setup to trust PolarProxy CA and BurpSuite CA.
- Windows 10 VM – For testing Windows applications. Setup to trust PolarProxy CA and BurpSuite CA.
- Ubuntu Waydroid VM – For testing Android applications. Runs Android inside Ubuntu. Setup to trust PolarProxy CA and BurpSuite CA.
- External Device Testing:
- Hooked up to the Isolated Network is a WiFi Router which physical devices can connect to and be tested in the same way as the VMs.
Setup Overview
In this post I’ll detail how you too can setup something similar in your instance of Proxmox. First I’ll start by setting up the VM for intercepting traffic and responding with fake responses. This allows you to test an application VM in a completely offline manor. Next we’ll take a copy of the interception VM and modify it to carry on intercepting traffic but instead returning responses from the internet for HTTP(S) traffic. Finally, we’ll look at how you can intercept traffic from physical devices (such as IoT devices)
Offline Analysis VM
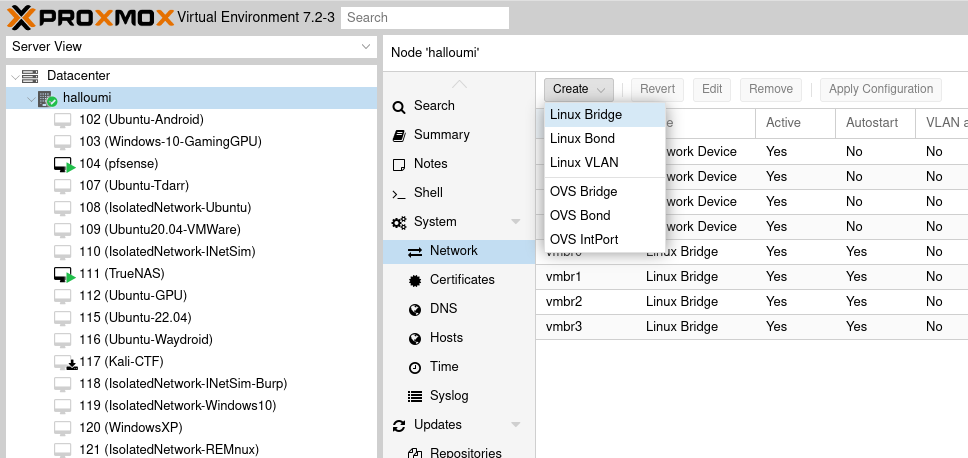
For the offline Analysis VM you need to first setup a new bridge in Proxmox. This bridge will be used to connect the VM under test to our Analysis VM. It won’t provide internet
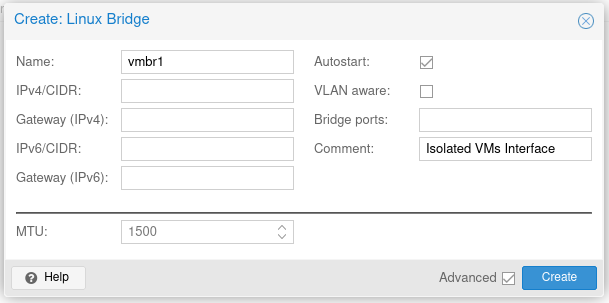
- Click System -> Network -> Create -> Linux Bridge.
- Fill in the comment as “Isolated VMs Interface” but leave all other options blank.
- For the sake of this tutorial, we’ll name this bridge “vmbr1” but it could be called anything
- Do not bridge this to any of your physical networks, this bridge should NOT have internet access.
You will also need some way to connect the Analysis VM to the internet at least for during setup. The guide assumes you have internet provided via an existing bridge. We’ll call this bridge “vmbr0”
Now we have our networking setup, now it is time to setup the VM. For this tutorial, I’m using a Ubuntu Desktop flavor but other flavors of Linux are available.
You’ll want to setup the VM as you usually would, it doesn’t need allocating resources above what you’d usually give to a standard VM (I gave mine 2 cores and 4GB of memory). However, you’ll need to ensure that you attach the two network devices and attach them to our vmbr0 and vmbr1. Once configured we’ll remove the network device for vmbr0. Start up the VM and install the OS and get to the point where you have access to a terminal.

Next, we need to setup a static IP for the vmbr1 interface on the VM. This is because our vmbr1 network doesn’t have a DHCP server. As this VM is going to be the gateway for all traffic of the VMs we are testing, we set the IP as the first IP in the subnet. For this tutorial, we’ll use 10.0.200.1/24 for this VM.
Now we need to setup a couple of pieces of software called INetSim and PolarProxy. We’ll mostly be following the instructions from this page – “Installing a Fake Internet”.
INetSim
Run the command below to install INetSim. INetSim will handle logging of most network requests for a range of services/ports.
sudo -s
echo "deb http://www.inetsim.org/debian/ binary/" > /etc/apt/sources.list.d/inetsim.list
curl https://www.inetsim.org/inetsim-archive-signing-key.asc | apt-key add -
apt update
apt install inetsim
Now INetSim is installed, we need to configure it. Open /etc/inetsim/inetsim.conf in a text editor and ensure you have the following lines:
service_bind_address 10.200.0.1
dns_default_ip 10.200.0.1

start_service dns
start_service http
#start_service https
start_service smtp
start_service smtps
start_service pop3
start_service pop3s
start_service ftp
start_service ftps
start_service tftp
start_service irc
start_service ntp
start_service finger
start_service ident
start_service syslog
start_service time_tcp
start_service time_udp
start_service daytime_tcp
start_service daytime_udp
start_service echo_tcp
start_service echo_udp
start_service discard_tcp
start_service discard_udp
start_service quotd_tcp
start_service quotd_udp
start_service chargen_tcp
start_service chargen_udp
start_service dummy_tcp
start_service dummy_udp
Do note that the https start_service line above must start with a comment ‘#’ as we don’t want INetSim to handle HTTPS traffic (we’ll setup PolarProxy for this).
Before we restart inetsim with the new configuration, we’ll need to disable any services that your OS is running already on the ports INetSim needs. In my Ubuntu setup, this required me to stop systemd-resolved as it was stopping INetSim from binding to port 53. Run the below commands to disable systemd-resolved and restart INetSim
systemctl stop systemd-resolved
systemctl disable systemd-resolved
systemctl restart inetsim.service
PolarProxy
Run the commands below to install PolarProxy. PolarProxy is a MITM proxy which has it’s own CA which it uses to decrypt the HTTPS traffic it recieves (we do have to install the PolarProxy CA on the test VM which we look at later). Once the traffic is decrypted it sends it onto INetSim which handles sending the fake response back.
sudo -s
adduser --system --shell /bin/bash proxyuser
mkdir /var/log/PolarProxy
chown proxyuser:root /var/log/PolarProxy/
chmod 0775 /var/log/PolarProxy/

su - proxyuser
mkdir ~/PolarProxy
cd ~/PolarProxy/
curl https://www.netresec.com/?download=PolarProxy | tar -xzvf -
exit
Now we need to configure the PolarProxy configuration. Load up /home/proxyuser/PolarProxy/PolarProxy.service in an editor. Change the line starting ExecStart to the following:
ExecStart=/home/proxyuser/PolarProxy/PolarProxy -v -p 10443,80,80 -p 10465,25,25 -x /var/log/PolarProxy/polarproxy.cer -f /var/log/PolarProxy/proxyflows.log -o /var/log/PolarProxy/ --certhttp 10080 --terminate --connect 10.200.0.1 --nosni nosni.inetsim.orgNow lets get the service file installed:
cp /home/proxyuser/PolarProxy/PolarProxy.service /etc/systemd/system/PolarProxy.service

systemctl enable PolarProxy.service
systemctl start PolarProxy.service
IPTables
Finally we need to redirect ports 443 and 465 to PolarProxy and redirect all other traffic that isn’t destined for this machine to INetSim & PolarProxy. Run the commands below to setup IPTables to do this redirection.
sudo -s
apt-get install iptables-persistent
iptables -t nat -A PREROUTING -i enp0s8 -p tcp --dport 443 -j REDIRECT --to 10443
iptables -t nat -A PREROUTING -i enp0s8 -p tcp --dport 465 -j REDIRECT --to 10465
iptables -t nat -A PREROUTING -i enp0s8 -j REDIRECT
/etc/init.d/iptables-persistent save
Monitoring Logs
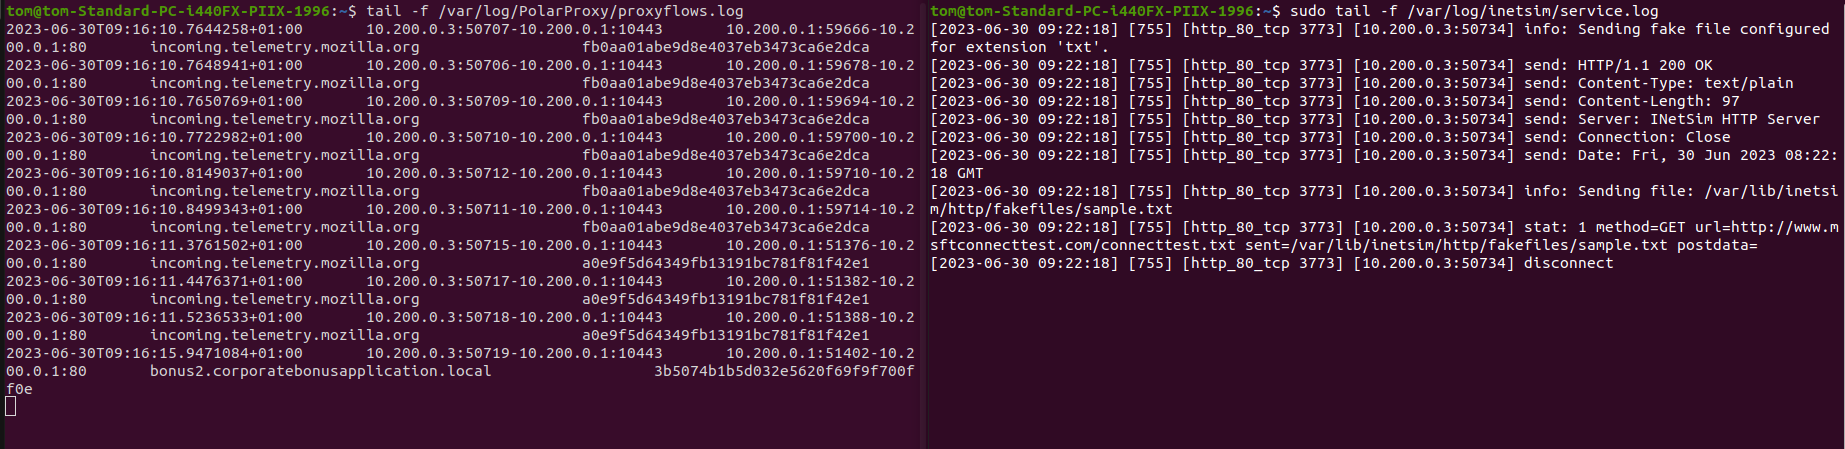
Now INetSim and PolarProxy are setup we should be good to go. You can find the logs at:
- /var/log/PolarProxy/proxyflows.log for HTTPS logs
- /var/log/inetsim/service.log for HTTP, DNS, etc logs
You can test it is working by visiting http://127.0.0.1, https://127.0.0.1 and/or doing a DNS lookup on this VM.
If we are happy that the setup is working then now is a good time to remove the vmbr0 interface from the VM.
Setup Test VM
Finally we want to setup another VM in Proxmox to run our applications we want to test. You’ll want to follow these steps:
- Setup VM and Install OS
- Connect VM to vmbr0 network and remove any other network devices
- In VM, setup the network adapter to not use DHCP and instead use a static configuration.
- Set the IP to 10.0.200.2 (or any other valid IP in this subnet that isn’t 10.0.200.1).
- Set the Subnet Mask to 255.255.255.0.
- Set the Gateway to 10.0.200.1
- Set the DNS to 10.0.200.1
- Setup the VM to trust PolarProxy’s CA (described below)
- Test your application
Install PolarProxy CA – Ubuntu
sudo apt-get install -y ca-certificates
wget http://10.200.0.1:10080/polarproxy.cer
openssl x509 -inform DER -in polarproxy.cer -out polarproxy-pem.crt
sudo cp polarproxy-pem.crt /usr/local/share/ca-certificates
sudo update-ca-certificates
Install PolarProxy CA – Other OSs
You’ll need to download the CER file from http://10.200.0.1:10080/polarproxy.cer. Then you’ll need to install that in the OS’s trust store. Some further details for different OSes can be found at:
Test Your Application
Congratulations. You should now be at a point where you can make network requests from your test VM and see the fake responses back from INetSim. You should also be able to see these requests logged in the Offline Analysis VM.
Online Analysis VM
Next up we are going to setup an Online Analysis VM where instead of serving fake requests as we did in the Offline Analysis VM, we proxy through requests from the internet. In this VM we are going to use BurpSuite Community for proxying HTTP(S) requests however other proxies are available such as OWASP Zap.
These instructions build off the above Offline Analysis VM so the first step is to create a copy of the Offline Analysis VM and call it the Online Analysis VM. We’ll want to modify this VM’s hardware to have the existing vmbr1 network interface but also have the vmbr0 interface so it can access the internet.
Do note: you should never run both the Offline Analysis VM and Online Analysis VM at the same time as they both have the same IP address and so responses back to the Test VMs may be duplicated or confused/lost.
Boot up the VM. For this VM we are going to replace PolarProxy with a proxy called BurpSuite which will handle proxying traffic from the internet. First step is to disable PolarProxy.
systemctl stop PolarProxy.service
systemctl disable PolarProxy.service
Next we modify INetSim to not listen on HTTP ports. Open up /etc/inetsim/inetsim.conf and ensure the http services lines are commented out by adding a ‘#’ at the start.
#start_service http
#start_service https
Now, restart INetSim to ensure we free up the HTTP and HTTPS ports for the next step.
systemctl restart inetsim.service Install BurpSuite Community
Visit https://portswigger.net/burp/communitydownload and download BurpSuite Community edition for your OS architecture. Once you have it installed we need to run the following command to grant BurpSuite the permissions to bind to privileged ports such as 80 and 443.
sudo setcap cap_net_bind_service=ep ~/BurpSuiteCommunity/jre/bin/javaDo note: if you update BurpSuite you’ll likely need to rerun this above command.
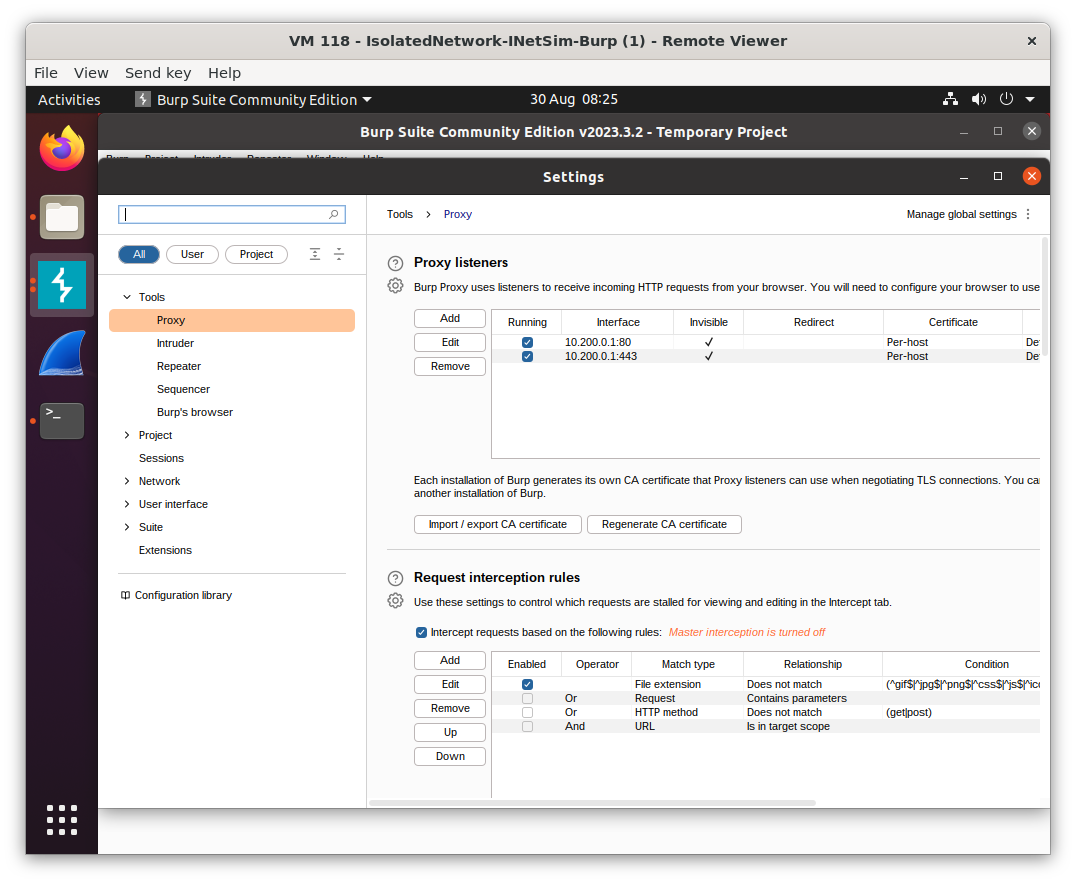
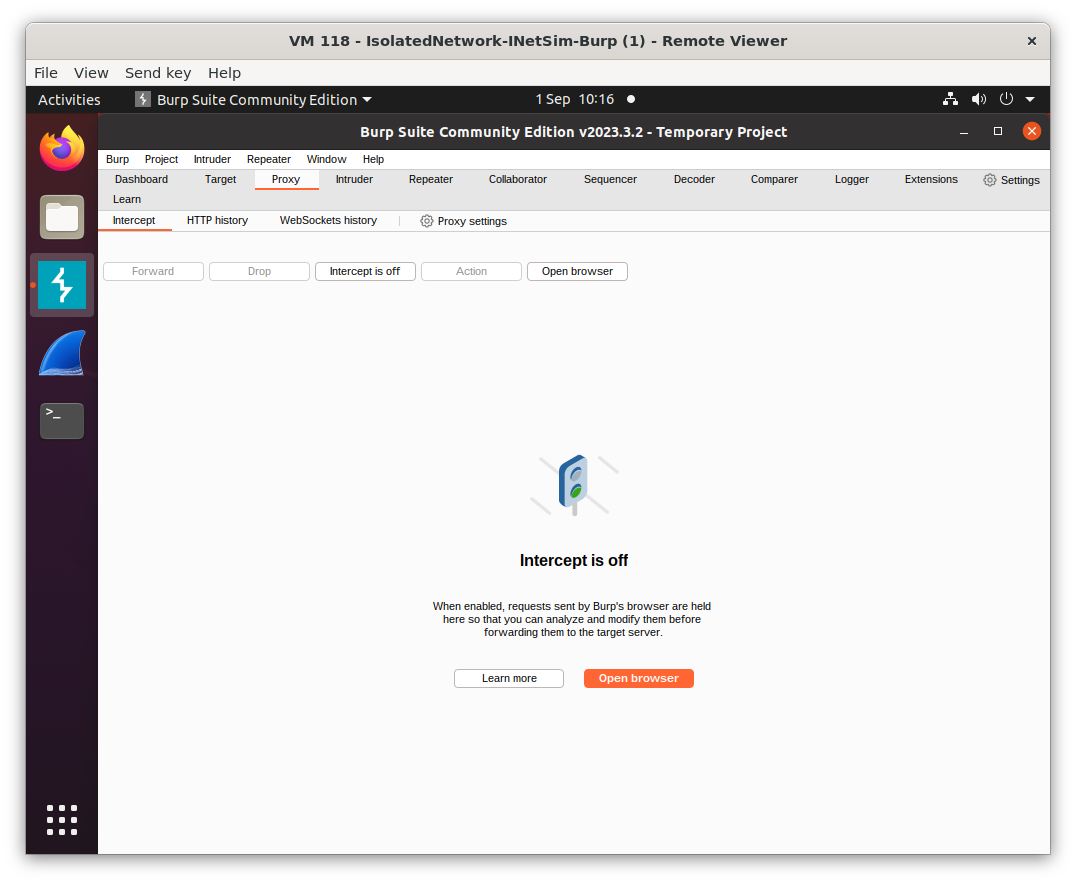
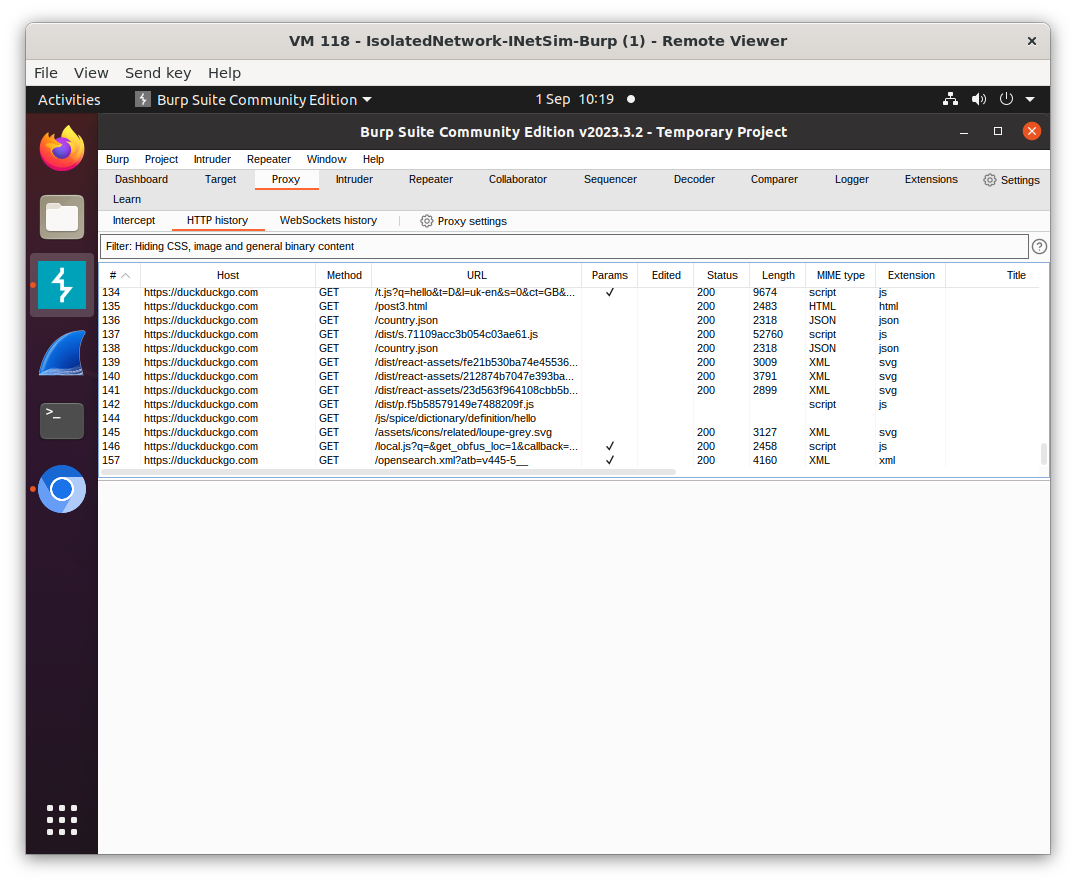
Finally we run BurpSuite and add in two Proxy listeners one on 10.200.0.1:80 and 10.200.0.1:443 as shown below. You’ll also want to make sure that the intercept is disabled otherwise all requests on the test VM will hang.
Step Test VM
You’ll want to follow the same steps to setup the Test VMs for this Online Analysis as you did in the Offline Analysis section above. The only exception is that for step (4) instead of installing the PolarProxy CA, we need to install BurpSuite’s CA instead. See BurpSuites documentation for details of downloading the CA. You’ll most likely need to visit http://burpsuite/cert or http://10.0.200.1:8080/cert to grab the CA.
Once you have the BurpSuite CA you can again follow the instructions from the Offline Analysis section for installing the CA (just replace mentions of PolarProxy.cer with your BurpSuite CA).
Test Your Application
Congratulations. The proxy is now setup so all HTTP and HTTPS traffic should be being intercepted and logged in your Online Analysis VM. The Test VM should be able to make requests and see the responses back from the server it was requesting. However on the Online Analysis VM you will be able to see all the requests logged and even tamper with the requests and responses.
Intercepting Traffic From Physical Devices
Now we have all of our interception VMs setup the only other area to look at is leveraging this setup for intercepting traffic from physical devices such as IoT devices, Laptops or Mobiles. The below setup details how I achieved this, however you can also do the same thing with a USB WiFi card without the need for a router but details of how to do that are out of scope of this guide.
To gain the ability to intercept traffic from physical devices, all you need is to add a spare networking card to your Proxmox server. This provides a dedicated Ethernet port which we can attach to our virtual vmbr1 network. Then we can get a Wifi router and attach it’s WAN port to this Ethernet port to provide WiFi and further Ethernet ports for physical devices. The only setup we need on the router is to check that the WAN port is setup to perform NAT, that the LAN has a DHCP server and give the WAN port a static IP of 10.0.200.2 (or higher).
Once this is setup you should start seeing intercepted requests in the Analysis VM. However, you will still need to setup the PolarProxy or BurpSuite CA as trusted on any device you want to test for HTTPS to be intercepted correctly.